Make a Simpler Portable Design Wall

My Portable Design Wall is Simply a Batting Pillowcase

December 2018
Once upon a time, more than anything I wanted a rigid portable design wall. There isn’t enough wall  space in my Manhattan apartment for a 'built-in' design wall.  

I tried to find insulation boards here on this island of 1.65 million people to make a design wall. There weren't any to be bought. Besides, how would I get the board home? On a bus? The subway? I don’t have a car. At 96” x 48”, what sort of vehicle could accommodate it?
I had resorted to using a metal door and magnets to hold blocks on the front door.
Eventually I got some boards and let me tell you, they are worth their weight in gold! I ordered the boards from Lowe’s. The nearest was in New Jersey! When I learned the cost of  basic delivery (omg) I doubled my order to four boards. Those boards could not come fast enough; I could hardly wait for them to arrive. 

Finally the truck arrived. The doorman called me on the intercom to announce two men were on the way up. I waited, and waited, and waited. Where had they gone? I buzzed down to the doorman. “Mrs. Solomon,” he said, “the boards are 96 inches tall. They won’t fit in the elevator. The men are on their way, walking up the stairs.” Gulp. 
I made my first portable design wall with batting and white duct tape. It was sort of like Scotch taping a hem in place. Awkward and inelegant. I wondered if I could encasing a board in a ‘pillowcase’ made of batting instead of using tape or pins. The answer was YES. If you want to get an idea of what the boards look like in real life, click here. 
The  96” x 48” board was taller than I needed so I cut 12” off of an endto make it 84” x 48:
For the 'pillowcase' I chose cotton batting because quilt blocks will “stick” to cotton. To keep the pillowcase from stretching over time, I chose cotton batting with a polypropylene scrim. I would expect a blend — say 80 percent cotton and 20 percent polyester — to work just fine as well. 

I chose Queen Size (90” x 108”) batting to make the pillowcase. Here’s my reasoning and math:
  • I needed at least 84” top-to-bottom + wiggle room, so 90” would be sufficient
  • The board is 48” across the front and 48” across the back; 96” in all. I figured 108” would be sufficient to cover the combined 96” and to generously allow 2” for the left edge and 2” for the right edge.  96 + (2 + 2) = 100
If it’s hard to wrap your head around the scale of this, pretend you are making a pillowcase with the board being your pillow.
Step 1
Fold the batting in half, either lengthwise or crosswise, to fit the board.

Step 2

Position the board with an edge aligned flush with the fold. (I could see a bit of batting peeking out). Outline the other three edges. I used a Sanford (aka Sharpie) Rub a Dub laundry marker. The weight of the board keeps the batting from shifting. Pin and/or clip as shown below. 


Step 3:
Sew along the top and side of the pillowcase, but not along the bottom and not along the folded side. I sewed with a 1¼” seam allowance. That’s 1¼” away from the marked line, toward the edge of the batting. Trim away excess batting from the top and the side, leaving about an inch in case you need to make an alteration. Turn the pillowcase inside-out to conceal the seams.
Along the top edge, the seam allowance isn’t critical. The pillowcase will be too long as it is.
Consider sewing the side with a very long stitch; a basting stitch is easier to rip out if necessary. Then try out the pillowcase. If it’s a go, reinforce the basting if you wish.
In this sewing video, I demonstrate how I use the Elna AcuFeed foot which acts as a walking foot, a size #14 quilting needle and a long stitch.
Placing the pillowcase over your board:
To load the pillowcase, I stood facing a free-standing sofa and held the board upright in front of me. I tilted the board and let it fall back onto the sofa. The sofa supported the far end of the board while the pillowcase was slipped over the near end.

After a few inches are loaded, it should slide on. Be patient. If it doesn’t slide on, then resew and increase the seam allowance. Then remove the side stitches that served as “pins.”
If the pillowcase isn’t as taut as you’d like, resew or clamp with large metal binding clips.


Finishing your portable design wall: 
It will take two people to maneuver the pillowcase over the board. To finish, either cut off the excess at the bottom (you have the previously marked line for a guide) or tuck excess up into an inside-out hem.

Do you use a serger? I do. After trying on the pillowcase for fit, I serged off excess batting, neatening the three raw edges:

  1. I unstitched the side seam near the bottom
  2. Then, I serged off the bottom edge, an ‘open’ single layer
  3. From there, I serged along the top
  4. Finally, I serged the side from top-to-bottom. It turned out so pretty.

Fussy Cut Sampler

June 20, 2017
"Summer Fussy Cut Away Camp"

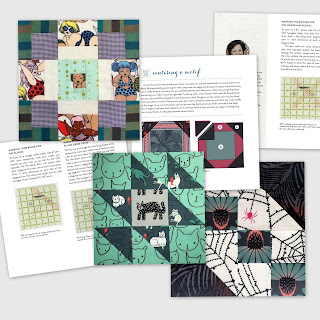
These days I'm sewing blocks from Fussy Cut Sampler book. There is a  Quilt Along happening, with prizes, and I'm posting my blocks to my Instagram account. The official Fussy Cut Sampler Quilt Along blog is here and ALL the Instagram images are here.

Nichole Ramirez and Elisabeth Woo, who I met through the Robert Kaufman Fabric company, wrote the brilliant and delightful book  "The Fussy Cut Sampler." It's a fabulous book, which  I know from experience as I am making their blocks, their way, and loving the process.


I'm cutting up my very best, most favorite,  epic fabrics for it.This is my block for today.  I cut the center motif from a 2010 Alexander Henry fabric. It takes me back to the grounds of the Musée Matisse
The book is beuatifully designed and published by Lucky Spool. Order an autographed copy, and you'll receive two autographs for the price of one book 😊😊

Make it Simpler, and Fussy Cut it this summer,
 Anita

Rock Solid Stars

June 14, 2017

The Fabric, A Book and A Giveaway

I curated a collection of my favorite solid color fabrics, The Make It Simpler Palette, for Robert Kaufman Fabrics.

The collection works extremely well together as you can see in my quilt below which was finished and quilted by Janice E Petre.

Now a wonderful book, Rock Solid, compiled by Karen M. Burns of 13 designer quilts made entirely of Kona fabrics has been published.
It's a fabulous resource.


Isn't the image a wonderful staging? Martingale, the publisher included the ground in all of the book's quilts, givng a them a spatial relationship.
Question: How many colors are in this quilt?
 Answer: THIRTY-TWO

Question: How many Geese units were sewn?
 Answer: NONE  They just happen by magic!

Question: Does Anita have a special technique to make these stars?
 Answer: Yes, and it's AMAZING!

Question: Where is the pattern for this QUILT?
 Answer: In the new book ROCK SOLID from Martingale
eBook GIVEAWAY
The Giveaway has closed and the winner contacted. Thank you for making the time to participate. -Anita
Choose one of my THIRTY-TWO favorite colors below (also viewable by clicking on the image) and leave it as a comment below. Martingale will forward the ROCK SOLID eBook to the winner. This giveaway is worldwide and closes  at noon ET, Wednesday June 21st. Please return to CHECK for winner if your email address isn't embedded in your coment.


Make it Simpler,
 Anita

Déjà vu and the Unbiased Quilt Block

August 21, 2016

It's Sunday morning. I'm at my desk, never with a cup of coffee, absorbed in an Electric Quilt project when an email from Electric Quilt arrives. What a coincidence, I must grab a screenshot:


The message is: What's new and trending at DoYouEQ.com? Whoa! I see my name, I see my block, it's Déjà vu all over again!!

It's a complete surprise to me. EQ's message includes a Lesson with links to my video and free pattern  EQ uses the Unbiased block to demonstrate a rotation lesson. You must check out their post. It's a goldmine.
I've got a boxful of leftover Unbiased Blocks. Recently my friend Karen took a stack off my hands and put this top together. With sashing! With a Mitered border! No wonder she's smiling ...
but a few minutes earlier she was surprised as were we all at the City Quilter...
It was a close call
Hmmm. Coffee.
Make it Simpler,
 Anita

Quick Techniques for Classic Blocks: Wrenches, Stars and Twists

March 2016
I give in. I'll use the word. AWESOME
I love to choose fabrics. I love to sew. And I get a kick from making it simpler. So...
I recorded a class for Craftsy which demonstrates my new methods. You can't tell what I do by looking at my work but if you watch the preview you'll see awesomeness. For starters, I did not sew triangles to the corners of the blocks below nor did I sew any Geese units for the stars above.

Make it Simpler,
 Anita

100 Quilt Blocks in 50 Days

A Story in Every Stitch a tale with
Fabric fit for a queen
Royal templates 
(The page from a book I wrote)
Download the Pattern PDF from Janome
 

The Secret Behind Anita's Hexagons

September 2015

C&T Publishing  encouraged its authors to mark this National Sewing Month and I got on board. My contribution is a very special Hexagon pattern that's been, unbelievably, under wraps for ten years.
How to Make the Best Use of Fabric
Use my line drawing to turn a 10" square of fabric into 7 hexagons (and 4 half-hexagons) in 10 cuts. Without waste.

It's typical of patterns in my Rotary Cutting Revolution book. Efficient cutting without waste or measuring.
I got together with Rachel Low here in New York at her Pins & Needles shop. Rachel is the C&T author of  Girl's Guide to DIY Fashion   We helped each other to make our how to videos. Have a look at mine, and if you hear a phone ring once, well, rings happen.
These fabric hexagons are suited for English Paper Piecing EPP. After making the video I polished up the pattern and made it available as this free PDF download
My technique-filled class Traditional Blocks Made Simple is on Craftsy. It includes as a bonus the PDF of Rotary Cutting Revolution. Identical to the paperback version complete with 300+ photos and easy to print patterns. All in all, a sweet deal to celebrate National Sewing Month for yourself.

Make it Simpler,
 Anita
It all began many hexagons ago...

Enjoy The Process: Anita's Square-On-Point Quilt Block

UPDATE 
This method and downloadable pattern is a bonus block in my Craftsy class

September 9, 2015
Summer Triangle Reruns Part 1

You say Tomato, I say Tomato
Some say Square in a Square, I've always called it Square-on-Point

Whatever you call it, I cut and piece it Simpler.  There is no waste other than eight teeny tiny triangles.
Two squares of fabric yield the equivalent of two quilt blocks + eight teeny tiny leftover triangles. For 40 blocks, you'd need 40 squares of fabric. For 100 blocks, you'd need 100 squares of fabric.
The complete and well-illustrated (over 31 photos) block pattern is available in my book Rotary Cutting Revolution The eBook on my publisher's website is preferable to the out-of-print paperback. Better to accurately print its CuttingLines patterns than scanning them.  
Make it Simpler,
 Anita

Summer Stitches

July 26, 2015

This summer I settled into writing, piecing and designing. My seventh Fiber of My Being column has already posted. These posts for Craftsy appear semimonthly; you can subscribe here
In  the Sweet Summertime Dreams column I mentioned my intention to remain in New York this summer. I'm thrilled everyday that the plan worked out.

I became better acquainted with newest machine "Elna Dunham" and progressed on an upcoming Elna group project "100 blocks in 50 days."
Years ago I broke a needle late at night which taught me to always have an extra package of needles on hand.  Can you see what I did wrong last week? Jeepers Anita!
 Make it Simpler,
 Anita

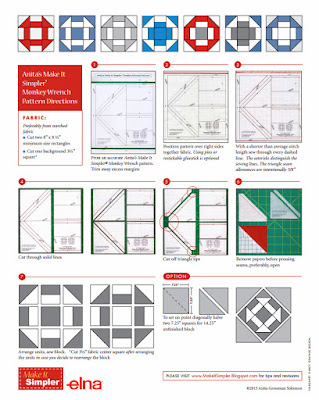
Anita's Make It Simpler® Monkey Wrench Block Pattern (aka Churn Dash)


Why am I smiling at the International Quilt Market? Because I went from petting an Elna Lotus sewing machine to becoming an Elna Boutique Designer in under 30 seconds.  Which means I've got something to make you smile too.
The complete pattern AND directions 
It's a no-measure, no-trim, no-waste solution

December 2020 The Monkey Wrench is included my 
I delight in making traditional blocks simpler and this Monkey Wrench is a chip off the old block. Here's a video glimpse 
 
Stack, sew on lines, cut, and sew.
It's how I made this butterfly version
You may know the pattern as "Churn Dash"
Why don't you try a Monkey Wrench and then think about the steps you didn't have to take? Start with: Gee, I didn't have to trim a triangle (HST)!
Stay tuned,  I'll be launching five additional CuttingLinespatterns to teach in my classes. Comments
I named her "Elna Dunham"

Make it Simpler,
Anita