Previous posts 1/3 2/3
June 25, 2012
Top Pressed Paper Piecing, the Make It Simpler® way. This post explains my techniques to cut and sew a basic block. It will likely take more time to read than the cutting, sewing, and 'ahh-ing'


 Quiltmaker published my block with standard directions. In my previous post I explained how to rapidly cut the patches with my signature CuttingLines™ Pattern. This third Ginger and Fred post explains how to TOP Paper Piece this block. Use the same Pattern to both cut and piece.


June 25, 2012
Top Pressed Paper Piecing, the Make It Simpler® way. This post explains my techniques to cut and sew a basic block. It will likely take more time to read than the cutting, sewing, and 'ahh-ing'

Ginger and Fred Hit the Road, 2012
I created the above quilt both for Quiltmaker's 100 Blocks and as a submission for a Modern Quilt Showcase. The block is basically a rectangle on point with alternating gray blocks. In other words, I used 'block by block' construction. The fabrics are from Dear Stella and Timeless Treasures


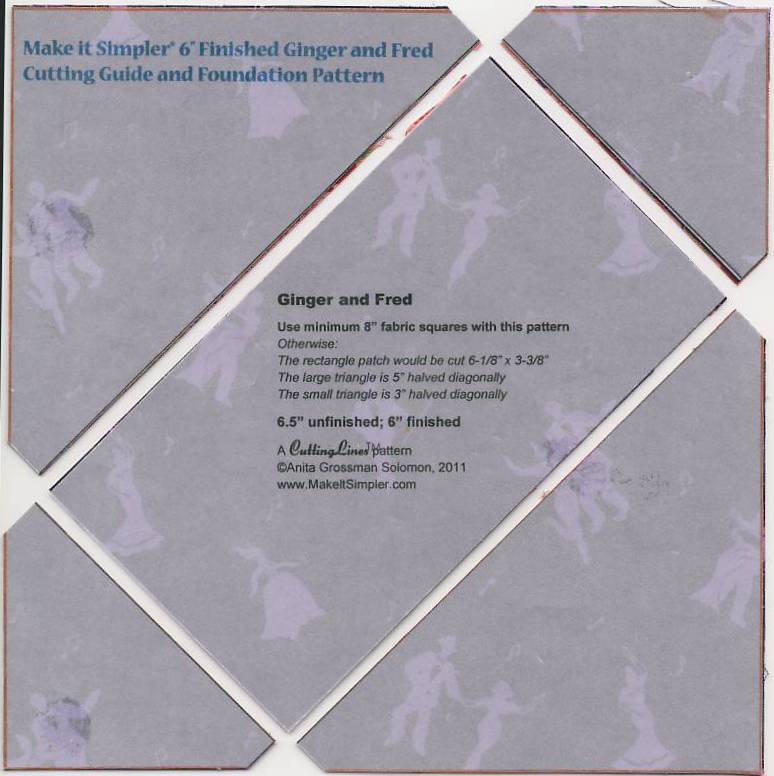
- Download the Make it Simpler 6" Finished Ginger and Fred Cutting Guide and Foundation Pattern PDF (the CuttingLines™ Pattern) from my previous post. Trim Pattern paper to a margin of approximately one quarter inch.

- Stack the fabric. With a repositionable/restickable gluestick (3M) or Collins Fabric Gluestick lightly adhere the CuttingLines™ Pattern to the uppermost fabric square
- Stack as many pieces of fabric as you are comfortable cutting through; practice with two pieces the first time
- Fabric may be placed printed side up or down. If the uppermost piece is 'down' it won't matter if glue remains on it
- I used Simple Foundations Translucent Vellum Paper to show fabric in the photo. I also Simple Foundations to 'center' a fabric motif.

- Cut the stack through the red outside lines, for accurately cut 7¼" squares without measuring! You don't have to read the lines on a ruler.
- If you've ever constructed a garment by cutting fabric under a tissue paper overlay the CuttingLines™ method will seem familiar to you
- Without disturbing the stack, line up a ruler with any 1 of the 4 diagonal lines. Cut through the stack along the ruler's edge completely from one edge of the paper to the other. Repeat to make 4 cuts in all.
- Anita warns, "ALWAYS cut through the lines." If you don't the rectangles won't be correct.
- If you need larger triangles, cut through a larger stack of fabric using the same Pattern. Instead of cutting 7¼" squares, cut outside of the red square, to allow extra fabric, say ¼", on all 4 sides of the stack.


The 4 diagonal cuts yielded 10 patches
- For two 12" finished Ginger and Fred blocks stack 8 squares of fabric, 4 of each 'color'

- Trim 1/8 inch off a long and short side of rectangle patch. Lightly glue rectangle into position on the Pattern leaving the outlines visible. An untrimmed patch would cover the outlines.
- Yes, the cutting and piecing is done with the same all-purpose CuttingLines™ Pattern
- I used Carol Doak's Foundation paper for the piecing

- Position the small triangles wrong side up. Optionally use glue (within the seam allowances) or pin them into place. I don't bother to pin or glue. The patches sit on the rectangle and fit just inside the lines

- Stitch ¼" parallel and inside of the printed line. This is top paper piecing! The patches are sewn on TOP of the PAPER

- Both small triangles have been sewn. It doesn't matter if they appear to be sewn with less than a ¼" seam. The ¼" seam is actually the area between the SEAM and the LINE on the paper

- Press the patches open

- Sew on a large triangle

- Press open the triangle to keep it out of the way

- Sew on remaining triangle

- Press and admire

- Follow the directions in the post to make a true up square. Trim block to 6½" square


- Two squares of fabric yield two blocks without wasting any fabric

Tips and Hints

Directional background fabric, as in the above stripe example, will automatically be aligned
Top pressed paper piecing has been around a long time. Seams are not sewn on a line but ¼" from the line. It requires fabric patches cut to size. Consequently, a top paper piecing pattern for a block is 'lined' differently than an Under pressed paper pattern
Use a shorter than use stitch length when sewing on paper but not so short that it would be a nuisance to undo a seam. A shorter stitch length makes more perforations in the paper than a regular stitch length. The more perforations the easier it is to remove the paper. I use a #14 denim needle. This needle is sharper than a #14 universal needle. A #14 makes a larger hole in the paper than a #12 needle. The larger the hole, the easier it is to remove the paper. Do not remove the paper until after the quilt top has been assembled.

This block construction has evolved from my first book, Make It Simpler Paper Piecing and my Square-on-Point technique in Rotary Cutting Revolution

Above detail is from of Micki's Square on Point Quilt. You see, in the end it's all about the fabric and the maker, not the technique
All rights reserved
Text and artwork ©Anita Grossman Solomon, 2012