Empty Spooling

November 24, 2012

A quilt instructor's holiday is when her job seems like a serene vacation. That's what my week at Empty Spools was like for me. Today I'm home in midtown Manhattan thinking about the week my so called work had my toes touching the Pacific. At Asilomar!
If these pictures look like 'camp' to you you're right. The Asilomar Conference Center had its start in 1912. It began as a YWCA facility designed by architect Julia Morgan in the Arts and Crafts style. The twelve structures of hers remaining at Asilomar are a National Historic Landmark and on the National Register of Historic Places. It's an extraordinary venue for Quiltmakers.

The sight of any quilt made at Empty Spools will always evoke memories of the stillness under the Asilomar pines and the exhilarating sounds of the waves breaking on the coast.
by Cheryl Malkowski
Friendships and Quilts, above and below are made 
by Celine Perkins
Anita's Quilt
When I last taught my Scrappy Pineapple techniques and quilt at Empty Spools the participants were either girlfriends, mother and daughter or sisters. The experience was wonderful for all of us. I teach this class only at seminars and retreats. Because its more than just a quilt.
Anita
If you've been to Empty Spools, please share your experience by commenting to this post. My girlfriends tried to tell me Asilomar was magical but I never imagined how remarkable my experience was to be.

Kaleidoscope Log Cabin for Quiltmaker's 100 Blocks

Friday, November 9, 2012
The newest collection of Quiltmaker's 100 blocks is available. It includes my contribution, the Kaleidoscope Log Cabin. I like that this Make it Simpler block creates it's own stripe sashing, hourglass posts on point, and bull's-eye log cabin centers.
My Kaleidoscope Log Cabin
Quiltmaker's 100 Blocks vol. 6 page 31
Participating 100 Blocks designers are linked on The Quiltmaker Blog
I based my block on an antique pieced wool quilt (below, on the table) in my collection. I stop in my tracks for any eccentric Log Cabin or Pineapple quilt. I brought the quilt to my classroom in New York's Riverbank State Park Cultural Center in 2007 with my first Kaleidoscope Log Cabin foundation block. I'd drafted it with Electric Quilt software. Blocks were sewn and colorful quilts began to appear from scraps.

I'm fond of those made of inconsistently sized patches in class quilts

The rendering below is an arrangement of square blocks

In my head I merged my block layout, above, with the distinct angularity of  Navajo blankets by re-working my Quiltmaker block into a rectangular 8:9 format. I chose that proportion, because it calls for 1½"  strips. That's a sensible size and besides, I'm always cutting 1½" strips for my next Self-Mitered Log Cabin
  
Above: A Navajo blanket 1863

8" wide x  9" tall rectangular blocks

Below are computer renderings of my Kaleidoscope Log Cabin composed of squares and below it, rectangles. In the real world I'd make it entirely scrappy without repeated blocks.


Square block layout


Rectangular block layout

For 100 fabulous new blocks I urge you to get a copy of Volume 6 for yourself. It includes 12" finished (12½" unfinished) Square Kaleidoscope Log Cabin.


You may download the variation, the Make it Simpler® Rectangular Kaleidoscope Log Cabin block pattern by clicking here 


For an opportunity to win a copy of Quiltmaker’s 100 Blocks, Volume 6, please comment by noon Monday, NYC time, telling me where in the world you live. If you don't see a "Post a Comment" link below, click on "Links to this post" 

11/12/2012
I was tempted to close my eyes and stick a pin into a map of the world for the giveaway winner;  Instead I relied upon Random.org  Kathy's number came up and I await her address. 

It's been a thrill for me to learn where the commenters reside. Thank you for sharing a bit of yourselves. My latest share is that I'll soon be heading to Denver to film some of my work for Craftsy I hope to 'see' you there.
Anita

Corny Newsletter

Sunday August 5, 2012
I published my fourth newsletter in, uhm, two years. Included in it is access to episode #905 of the The Quilt Show. This is the Rotary Cutting episode I recorded with Alex Anderson and Ricky Tims in August 2010 in Boulder, based on my book

The link to complimentary access to the video will  expire on August 8th

If you'd like to receive future newsletters from me, subscribe here

Eye Candy

Thursday, July 18, 2012

How could you not spot a quilt or fabric designed by Jane Sassaman? It has a distinctive look, sometimes punctuated with black. It's unique and masterfully drawn by her, the designs beautiful and handsome at the same time. I remember seeing her genius first line at the FreeSpirit showroom in New York;  I did not come home empty handed.

Using fabric to its potential is another story. Or it used to be. Because Jane has written a new book, the masterwork: Patchwork Sassaman Style. It's a cultivated garden of quilt design ideas. She clearly demonstrates how one might take advantage of her signature fabric, or other fabric, in your work. Jane guides you all the way. If you are new to quilting, Jane will astonish you with her lavish illustrations and brilliant ideas. If you are into Hexies I bet you've never come across a Grandmother's Flower Garden, Sassaman-style.  If you aren't a quilting virgin, you'll grin upon seeing what quilt books used to be like.

As we say in New York, "Either you have it or you don't." Jane has it. Big time.

I was smitten by her book a few weeks ago and have been picking it up daily and marveling at her insights. I wouldn't be surprised if I came across it in a Metropolitan Museum of Art bookshop. It's that special.

The book's publisher will send a copy to one reader with a U.S. address who posts a comment here before noon, FRIDAY July 20th, New York time. COMMENTS are now 'CLOSED'. Thank you for your participation. -Anita

[I am typing this post on a smartphone, hence no images. My home DSL Internet service went down before my eyes just after midnight last night. I blame it on the construction of the new Second Avenue subway. I've been eighteen hours without service. Sigh.  How ironic to be writing about glorious large scale prints on a tiny screen.]  [New York - July 18, 8:54 p.m. Yay, I have internet service again! J ]

Here's to you Jane. Congratulations.

-Anita

On Top with Ginger and Fred (3/3)

Previous posts  1/3  2/3
June 25, 2012
Top Pressed Paper Piecing, the Make It Simpler® way. This post explains my techniques to cut and sew a basic block. It will likely take more time to read than the cutting, sewing, and 'ahh-ing'
Ginger and Fred Hit the Road, 2012
I created the above quilt both for Quiltmaker's 100 Blocks and as a submission for a Modern Quilt Showcase. The block is basically a rectangle on point with alternating gray blocks. In other words, I used 'block by block' construction.  The fabrics are from Dear Stella and Timeless Treasures
   Quiltmaker published my block with standard directions. In my previous post I explained how to rapidly cut the patches with my signature CuttingLines™ Pattern. This third Ginger and Fred post explains how to TOP Paper Piece this block.   Use the same Pattern to both cut and piece.
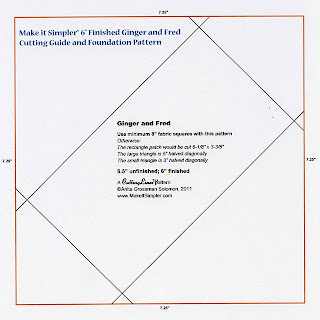
  • Download the Make it Simpler 6" Finished Ginger and Fred Cutting Guide and Foundation Pattern PDF (the CuttingLines™ Pattern) from my previous post. Trim Pattern paper to a margin of approximately one quarter inch. 
  • Stack the fabric. With a repositionable/restickable gluestick (3M) or Collins Fabric Gluestick lightly adhere the CuttingLines™ Pattern to the uppermost fabric square
  • Stack as many pieces of fabric as you are comfortable cutting through; practice with two pieces the first time
  • Fabric may be placed printed side up or down. If the uppermost piece is 'down' it won't matter if glue remains on it
  • I used Simple Foundations Translucent Vellum Paper to show fabric in the photo. I also Simple Foundations to 'center' a fabric motif.
  •  Cut the stack through the red outside lines, for accurately cut 7¼" squares without measuring! You don't have to read the lines on a ruler.
  • If you've ever constructed a garment by cutting fabric under a  tissue paper overlay the CuttingLines™ method will seem familiar to you
  • Without disturbing the stack, line up a ruler with any 1 of the 4 diagonal lines. Cut through the stack along the ruler's edge completely from one edge of the paper to the other. Repeat to make 4 cuts in all.
  • Anita warns, "ALWAYS cut through the lines." If you don't the rectangles won't be correct.
  • If you need larger triangles, cut through a larger stack of fabric using the same Pattern. Instead of cutting 7¼" squares, cut outside of the red square, to allow extra fabric, say ¼", on all 4 sides of the stack. 
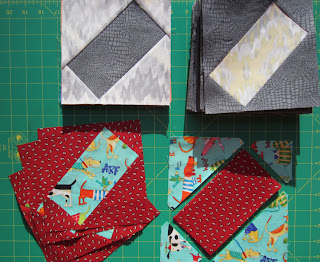
The 4 diagonal cuts yielded 10 patches
  • For two 12" finished Ginger and Fred blocks stack 8 squares of fabric, 4 of each 'color' 
  • Trim 1/8 inch off a long and short side of rectangle patch. Lightly glue rectangle into position on the Pattern leaving the outlines visible. An untrimmed patch would cover the outlines.
  • Yes, the cutting and piecing is done with the same all-purpose CuttingLines™ Pattern
  • I used Carol Doak's Foundation paper for the piecing
  • Position the small triangles wrong side up. Optionally use glue (within the seam allowances) or pin them into place. I don't bother to pin or glue. The patches sit on the rectangle and fit just inside the lines
  • Stitch ¼" parallel and inside of the printed line.  This is top paper piecing!  The patches are sewn on TOP of the PAPER
  • Both small triangles have been sewn. It doesn't matter if they appear to be sewn with less than a ¼" seam. The ¼" seam is actually the area between the SEAM and the LINE on the paper
  • Press the patches open
  • Sew on a large triangle
  • Press open the triangle to keep it out of the way
  • Sew on remaining triangle
  • Press and admire
  • Follow the directions in the post to make a true up square. Trim block to 6½" square
  • Two squares of fabric yield two blocks without wasting any fabric
Tips and Hints

Directional background fabric, as in the above stripe example, will automatically be aligned

Top pressed paper piecing has been around a long time. Seams are not sewn on a line but ¼" from the line. It requires fabric patches cut to size. Consequently, a top paper piecing pattern for a block is 'lined' differently than an Under pressed paper pattern

Use a shorter than use stitch length when sewing on paper but not so short that it would be a nuisance to undo a seam. A shorter stitch length makes more perforations in the paper than a regular stitch length. The more perforations the easier it is to remove the paper. I use a #14 denim needle. This needle is sharper than a #14 universal needle. A #14 makes a larger hole in the paper than a #12 needle. The larger the hole, the easier it is to remove the paper. Do not remove the paper until after the quilt top has been assembled.

This block construction has evolved from my first book, Make It Simpler Paper Piecing and my Square-on-Point technique in Rotary Cutting Revolution
Above detail is from of Micki's Square on Point Quilt. You see, in the end it's all about the fabric and the maker, not the technique

All rights reserved
Text and artwork ©Anita Grossman Solomon, 2012

Ginger and Fred to Appear in Quiltmaker's 100 Blocks, Vol 5 (2/3)

May 4,  2012
Previous posts 1/3   3/3 
The tale of Anita, Ginger, Fred, and two PDFs

I created "Ginger and Fred" especially for Quiltmaker's 100 Blocks Vol 5
and, for Quiltmaker readers, the  two Make It Simpler PDFs found below. If you've read my book Rotary Cutting Revolution from C&T Publishing, 2010, you'll recall similar projects.

Q: What do you like best about Ginger and Fred?
Look at the rectangles. They dance and float. Unlike their parent block “Good Fortune,” their corners aren’t designed to meet let alone match up. If the centers of each block don't meet, that won't be obvious either.
Four 12½" unfinished Ginger and Fred blocks (24" square, finished)

Q: Do you have a special way to cut the fabric patches not in the issue?
Yes. I use my CuttingLinesTM pattern instead of cutting individual squares and rectangles. I can cut enough  pieces for two 12" blocks (40 pieces) in four rotary cuts from a stack of eight 8" starched fabric squares. Without waste.
Q: Huh?
When I sewed clothing, I positioned a large tissue paper pattern on folded fabric and cut through the printed tissue for the garment pieces. I learned to sew in the ‘60s at the Singer Sewing Center on Falls Street. In Niagara Falls, site of hydroelectric power plants, I was sewing 'Carnaby St Mod' shifts at home on a treadle machine.

Q: So you cut through tissue to get the pieces for a block?
I cut through ordinary photocopy paper

Q: What about special rulers or dies?
Not to cut through a paper pattern. Any straight edge ruler and rotary cutter will do

Q: Is fabric bias a concern?
No, because the outside edges of the block are straight of grain.
The rectangle has bias edges but, advantageously, directional fabric will maintain it’s direction. If you were to cut individual rectangles on grain, any motif would wind up tilting 45 degrees in the block.

Q: What's the method?
  • Download this The Ginger and Fred Pattern PDF, trim away excess margin leaving the red lines intact (above) 
  • Cut or tear starched fabric into squares, at least 8" on each side 
  • Stack fabric squares, preferably right sides up. Stack as many as you can comfortably cut through. I cut 8 squares at a time which is enough for two blocks  
  • Use a repositionable gluestick (3M) or Collins Fabric Gluestick to adhere the pattern to the uppermost fabric square  
  • Cut the stack through the red outside lines, for accurately cut 7¼" squares (no measuring!)
  • Without disturbing the stack, line up a ruler with any 1 of the 4 diagonal lines. Cut the stack along the ruler's edge completely from one edge of the paper to the other. Repeat to make 4 cuts.
Beneath each of the 5 paper shapes is a red fabric patch

Q: Speaking of bias, will the triangles be large enough?
Yes, they are sufficient and accurate and cut from stabilized (starched) fabric. If you have difficulty sewing corner triangles, as these are called, cut oversize triangles.

Cutting oversize: Cut fabric squares at least  8½" instead of 8"  Rather than cutting  through the outside red lines, cut  ¼" outside of the red lines. Cut along the diagonal lines as described above. The rectangle should and must remain the same size, (6 -1/8 x 3-3/8 inches) but the triangles will be oversize.

Q: Do you have a special way to sew the block together?
Yes. I use the pattern for top paper piecing as well; I'll post the explanation this month. If you are in a hurry, see p69 of Rotary Cutting Revolution

Q: How do you true-up this block when oversize triangles are used?
I make a true-up square
With a permanent fabric marker, trace a rectangle (only), using this True Up Guide, onto a 6½" acrylic square. Center the marked ruler over the pieced block and trim away any excess fabric. 
The marks may be removed with alcohol

Q: Have you made a quilt of these blocks?
Yes. It's kind of Mod. But I didn't sew it on a treadle. It's “Fred and Ginger Hit the Road” It’s among the 15 quilts in the Quiltmaker Designer’s Gallery in Quiltmaker's 100 Blocks Vol 5
Ginger and Fred Hit the Road
Q: Really, Fred and Ginger are in the above quilt?
Yes. I'll explain that process during this month. Right now you have plenty of blogs to read and I hope some weekend sewing .

For the opportunity to win a copy of Quiltmaker’s 100 Blocks, Volume 5, please comment by noon Monday, eastern time, telling me where in the world you live. Comment anyway, I'd like to know where you are! Feel free to ask questions about the block techniques.

Q: What other blocks have you engineered CuttingLines™ for?
Here's an example J

If you don't see the "Post a Comment" link way below, click on "Links to this post" and look to the bottom to post a comment.

May 7, 2012: The Draw
In essence, everyone received a gift to celebrate the Vol 5 issue of 100 Designers, i.e. my CuttingLines™ PDFs linked above.  Jitka, won the giveaway but I received a jackpot: The Comments.  I felt as if I traveled the world over the weekend. I appreciate your making the time to write them.

Stay tuned for continued instructions regarding the Ginger and Fred block. Let’s face the music and quilt.


Trip the light fantastic with Quiltmaker

Anita